Create Calculator in Android Programming
As we have already discussed about some of the basic GUI creation like Button and Clock in Android Programming. Now its time to Move ahead to some advanced and tricky codes. Today i have found the calculator name as “touch calculator” and developed by the Ali Ozgur. He is the programmer and lead developer of many popular app for the iOS and Android devices. So today i am going to share this small project that might help you to expand your thinking in Android Programming.
if you directly drop here and new to android programming then i prefer to start reading our basic tutorial and first read the basic of android programming.
Aim: To develop a calculator with some simple arithmetic Function.
How to make a GUI of Calculator?
When you create a new Android project in Eclipse, you will have a default layout xml file named main.xml under res/layout folder. We will create the calculator user interface declaratively, not from code, inside this xml file. Using declarative xml files, layout files, while constructing the user interface has advantages.
The main advantage of using XML is that you separate the presentation of your application from the code used to control your applications behavior.
As i have already explained Building blocks of Android UI are Views and ViewGroups. We are using both to create a interface controls like a button and textview. I am not going to provide you all source code in post as i will give you the download link of complete zip file but for understanding let me provide the code which do the actual layout creation of calculator.
<?xml version="1.0" encoding="utf-8"?>
<LinearLayout xmlns:android="http://schemas.android.com/apk/res/android"
    android:orientation="vertical"
    android:layout_width="fill_parent"
    android:layout_height="fill_parent">

	<TextView
	    android:id="@+id/txtStack"
	    android:layout_width="fill_parent"
	    android:layout_height="wrap_content"
	   	android:textSize="15sp"
	    android:gravity="right"
	    android:layout_marginTop = "3sp"
	    android:layout_marginLeft = "5sp"
	    android:layout_marginRight = "5sp"/>

    <TextView
    	android:id="@+id/txtInput"
    	android:layout_width="fill_parent"
    	android:layout_height="wrap_content"
    	android:textSize="25sp"
    	android:gravity="right"
    	android:layout_marginLeft = "5sp"
   		android:layout_marginRight = "5sp"/>

    <TextView
    	android:id="@+id/txtMemory"
    	android:layout_width="fill_parent"
    	android:layout_height="wrap_content"
    	android:textSize="15sp"
    	android:gravity="left"
        android:layout_marginLeft = "5sp"
   		android:layout_marginRight = "5sp"/>

<GridView xmlns:android="http://schemas.android.com/apk/res/android"
    android:id="@+id/grdButtons"
    android:layout_width="fill_parent"
    android:layout_height="fill_parent"
    android:columnWidth="90dp"
    android:numColumns="5"
    android:verticalSpacing="10dp"
    android:horizontalSpacing="10dp"
    android:stretchMode="columnWidth"
    android:gravity="center"/>
</LinearLayout>
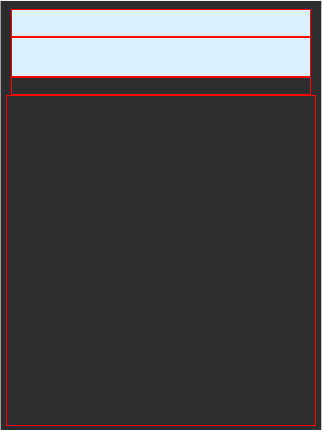
Now if you are familiar with the Layout management of Java then you can easily understand this else this may feel difficult to you. Now here we are using textview to represent the Screen of calculator and grid view to create the numeric keypad. Now the above code will do the layout creation and that will look like this.

The section above is used to display the numbers and calculation respectively. Now the rest of part is the Button creation, button management and logic of calculation and those are completely described in the package of source code that you can download from the link given below:
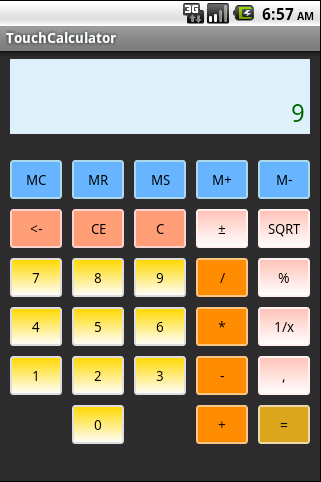
Download the file and Run it and once accomplished and executed successfully then you will see your calculator like this. if you face any problem with executing a program then read: How to run android code.

All the images and icons that are used is given in the package. Don’t worry.
Note: if eclipse give you error while editing res/values/strings.xml resource then you can solve this by opening the string.xml in text editor and simply replace the <resource> to <resources>.
That’s all for now. If you have any problem the drop a comment or contact us.
Happy Programming…!!

Hello Shahid, I also want to learn about Android Developing. What form of Java should I learn before getting into it?
If you are in terms of Core and Advanced java and something about Applet and all…then your answer is to learn most of core and Applet. If you are newbie then go to this link .
Thanks for replying Shahid. I’m a newbie in Java. I’m planning to take a course for Java. They say that they will teach Java Programming Language. So will it be enough to jump into Android.
Sorry for late reply But i can’t say whether that is enough or not but you know no one can teach you the complete language. From where i learn is the Google and Complete reference of Java. Refer this Book.
Thanks for replying Shahid. BTW, which book are you saying about.
Yeah My pleasure Amrit…..Just keep visiting our site for latest updates like this 🙂
Thanks for the awesome tutorial.